Today, I went through the entire process of collecting grape bunches, separating the good grapes from the bad, pressing, clarifying, and starting the fermentation process. What a crash course for the harvest season!
The winery that I work at has a small amount of grapes vines directly on the property itself. These grapes have been attracting unwanted wasps for the past weeks, so it was time to take them down and make wine! Let me tell you, it takes nerves of steel and a very zen head-space to remain calm while cutting grapes off vines surrounded by wasps. Surprisingly, I did not get stung once. Not even close. I am a zen master.
After the grapes were cut off the vines, I went through the time-consuming process of cutting out bad, vinegary, blackened, unwanted sections of grapes on the bunches.

I then took the grapes and was shown how to press them. First we used a traditional press. This was a very lengthy process, requiring time for gravity and pressure to press the juices from the grapes, through the cloth, and out of the filter. I couldn’t believe the dirty grey/brown looking colour of the juice that came out! A degree of murkiness is necessary to give the yeast something to eat and something to hold on to.


We then switched to a hydraulic press. This went much faster and we were able to press three times. This press works through water pressure. The cylindrical tub is filled with the grapes, then a balloon in the center of the machine is filled with high-pressure water, pressing the grapes against the tub, through the cloth filter and out of the machine.
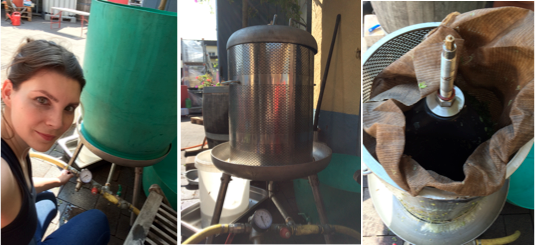
After each press, the grapes (or what’s left of them) are moved and stirred by hand. By the third press, grape seeds started to come out of the machine!
When the pressing was done, we measured the sugar and acid levels of the must. Our readings were:
- 79 Oechsle after first press
- 77 Oechsle after third press (after the smaller, more acidic grapes are pressed)
- 5 Acid level
- 15L must
Then we added the clarifying agents:
- 7-8g charcoal (5-10% charcoal/ estimated 5-10% rot)
- 15g Bentonit (50/150g/ 100L)
- 3g Floral Clair (10-20g? 100L)
- 8ml Kieselsol (30-100ml/ 100L)

Then it was time to ferment. A Riesling strain of yeast was added to 1 litre water and 1 litre wine. Because the juice was so cold, we left the yeast to begin the fermentation process in the small glass until the larger container warmed up, at which point the contents of the small container were added to the entire 15 litres of must.

Now each day I must check the sugar level and the temperature of the fermenting wine. I write my findings on a graph and track the changes. Updates to come.
(Also, apologies for mixing German and English terminology. It’s strange learning something new for the first time in a foreign language-I don’t even know some of these terms in English!)

OK, there are so many things that I never even considered. The bad grapes you have to get rid of and the wasps. It is hard to imagine getting much juice from a grape, yes they taste juicy, but not like a watermelon or orange. It was very interesting what the first set of juice looked like.
LikeLike