Pruning in the Winter

Why Prune?

One of the first rules of grape growing is: struggle = reward. This is why artificially watering vines, even in times of drought, is generally disproved of (or illegal) in order to make sure the roots grow deep and strong and lead to more resilient vines. When it comes to the production of grape clusters, you want to aggressively prune branches in order to condense the available nutrients into each grape berry. Too many grapes fighting over limited nutrients a great wine does not make. You need to keep the quantity low and quality high.

In fact, quality designations in wine are partially derived from the amount of grapes picked from vineyards. Each country has it’s own regulation. For example, in France the AOC regulates the allowed yields. In Germany’s VDP classifications, the basic “classic” wines can be harvested at a yield of 100 hectare litres/ hectare; after that it drops drastically to 60hl/ha for all other succeeding “selection” quality designations. In addition to protecting the consumer by regulating quality, this also helps avoid more overproduction in an already saturated market.

In the first months of the new year, when the vines are dormant, you select which vine branches will be kept to produce that year’s grapes. Branches that are too new, or grow spontaneously from the bottom of the trunk, lack genetic information that tells them how to grow grapes. Keeping old vines means an unruly, unmanageable trellis with too many grapes and branches fighting for a limited energy supply.

How to Prune

Cane Pruned vs. Spur Pruned Vines

There exist two different methods to prune grape vines: cane pruning and spur pruning. The decision on pruning style depends on the quality of the branch-growths available, and then how you train the branches to grow (though certain pruning styles are more effective for certain grapes varieties).

image-21-e1456686103970-300x300

First: Instructions on How to Prune

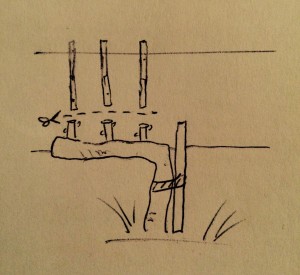
For cane pruned vines, as a basic rule of thumb, you count from 1 to 3 to understand which branches to keep and which to cut. 1=last year’s branch that will grow this year’s shoots and grapes; 2=branch from 2 years ago; and 3=the head – in old vines the gnarly looking nub that is connected by 2 or 3 years to the original trunk that gets larger and larger with pruning.

image-22-e1456686139766-225x300

The “Head” of the Cane System

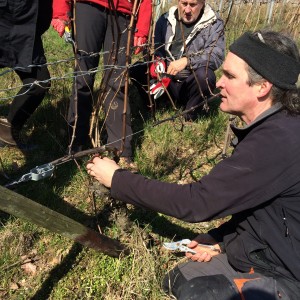
By cutting the 2-branch at the point just after the 1-branch, you are keeping the branch that will grow this year’s grapes as close to the trunk, and therefore energy supply, as possible. The 1-branch gets bent around the bottom metal trellis wire (like the 2-branch as seen in the photo below) and then grows new shoots up towards the sun and sprout grape clusters.

Officially speaking, for this year’s growth the 1-branch is called the cane, the 2-branch the arm, and the 3-branch the head.

image-23-300x225

The 1-2-3 Method of Cane Pruning

With spur pruning, a long, thick, semi-permanent branch called the cordon grows horizontal along the trellis wire from the trunk. From the cordon, spurs grow up and produce the grape shoots. With pruning, you are essentially giving dormant canes a hair cut and they are now called spurs. This method is simpler to understand and execute.

image-20-e1456682547510-300x275

Spur Pruning a Cordon System
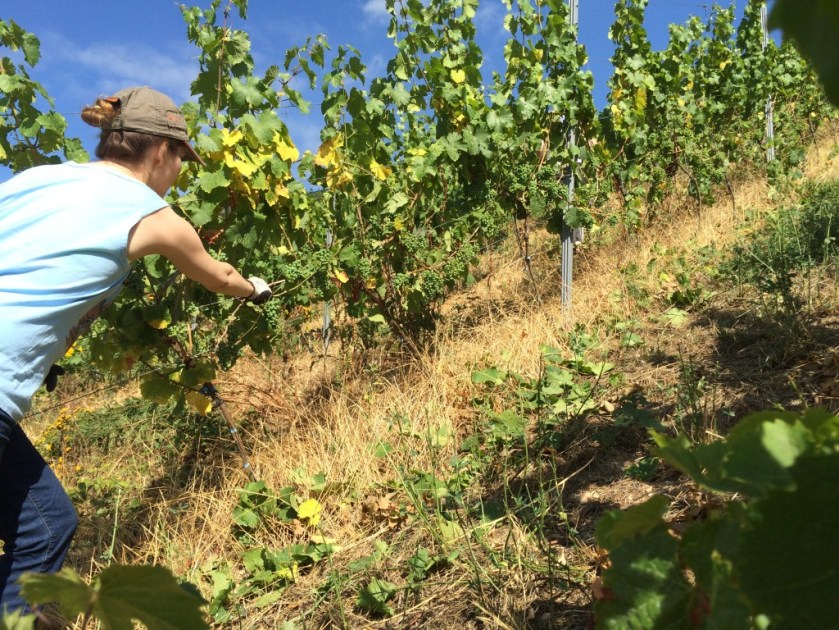
Learning Curve

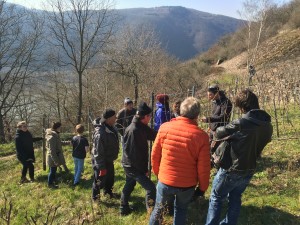
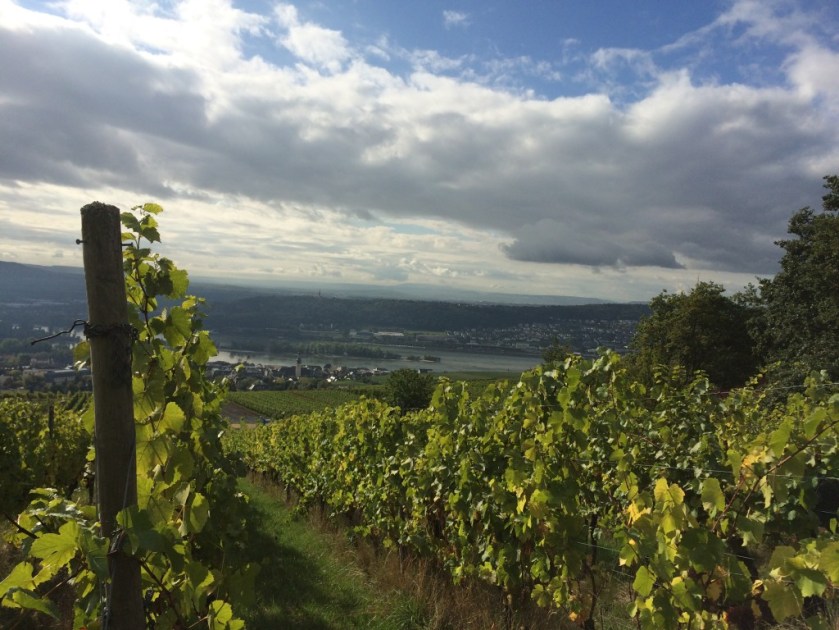
On Saturday, in sunny 7ºC weather, I, along with members of Garage Winery’s vine sponsorship community, met on the hills of Rüdesheim above the Rhein River to learn about pruning and try our hand at the process. It is quite upsetting to see such large pieces of healthy vines be cut. It takes some time to come to terms with the fact that the branches grow back during the season and that this truly is the best way to keep the grapes as healthy and flavour-packed as possible. After all, wines are the result of not only the wine making process, but of decisions made to the raw material in the vineyards. So go ahead and prune those vines. No pressure.

image-15-300x225
Make sure you cut the right branches!

Harvesting – In the Vineyards

YES! The 2015 harvest has come and gone! Sugar and acid levels were triple checked. The tanks and buckets and hoses all cleaned. The press and destemer were installed. And the wine makers had formulated a plan for which vineyards to harvest first, and which ones to do by hand versus machine harvest.

Machine Harvest

In the case of this year’s harvest, the first few vineyards to be picked were on flat terrain, ideal for employing the machine harvest method. Sure, there is a romantic idea of hand picking, but when costs and time are compared, hiring a machine to do the work makes sense.

This machine works by alining itself (manually-driven, but also somewhat automated) with a row and straddling the trellis so that both the sides of the same row go through the machine’s mechanisms. By shaking the vines using oscillating rods, this machine pops the berries right off from the stems! They are caught as they drop, then ride along a conveyor belt on the machine through a screening process to filter out any debris.

Shake, shake, shake

I was able to ride inside one of these grape-picking machines and ask the driver some questions. What I found out is that during the harvest season these picking machine drivers work around the clock. 14 hours a day. They are in demand because not every winery owns this specialized machine. And when the grapes are ready to be picked, the winemakers need the machine pronto.

“The Grapeliner”

I also discovered that the wrong vines do on occasion get picked. Many of the rows have no obvious indication of who owns them, and many of the same grape varieties are planted by different wineries. So what happens then? If it is caught it time, there is no real harm done. Otherwise, if the winemaker has a sense of humour, a deal is reached. Everyone knows everyone around here and everyone must work together.

Hand Harvest

But not all vineyards are on flat ground. In the Rheingau, the most prized wines come the very steep slopes along the Rhein river. At this time students are called in to help with the hand harvest. Some assemble at the winery at 8:00am to get driven to the vineyard. Others who know the location drive themselves. It is the beginning of October but there is a bit of a cold spell and a moderate amount of rain is predicted.

image2-300x216

Quasimodo?

Let me tell you. Working on these steep slopes is HARD WORK. Even in the best-case senario where you have all pristine, perfect grapes and can just move along the vines cutting them off at lightening speed, you are still spending hour after hour hunched over on a 40 degree angle and moving heavy buckets as you go. Mentally, the work can be relaxing, since all your thoughts are focused on these berries. In the worst case situation, you have grape bunches with a mix of healthy grapes, noble rot, vinegar, oidium, and a host of other grape diseases all on the same bunch. This is particular slow and labour-intensive work. You cut one bunch off, scrap off the diseased parts, cut the noble rot grapes off into one bucket, place the remaining healthy grapes in another bucket, repeat. Grape bunch after grape bunch. This is mind numbing. This is also how some of the best sweet wines are made. By taking the time to let the grapes develop the nobel rot Botrytis, and then spending the efforts to separate them out from the normal good and and the just plain bad berries, you get a wine that is really high is residual sugars (think Auslese or late harvest) and sells for a lot of money.

Separating the berries

To ease the pain of this backbreaking work, food and drinks are provided by the employer. On a nice day, sitting down in the middle of the vineyards for a snack and looking out over the beautiful landscape almost makes you forget how many more rows of picking are ahead of you.

image22-300x225

Enjoy the view!

Science in the Vineyards

As the harvest draws nearer and nearer, a close eye is kept on the acid and sugar levels in the grapes. The longer we wait, the lower the acid and higher the sugar levels become. Some grape varietals such as Gewürztraminer ripen earlier and is therefore harvested earlier. High acidity is preferred for sparkling wine, so those grapes are harvested before sugar levels get too high. In general, however, we need some steady, mild heat and sunshine in the home stretch.

IMG_1979-1024x768
Sun or storms?

Unfortunately, the past couple weeks have been cold and rainy. This is not too good for this critical time in the grapes’ ripening. Too much rain at this time and the grapes become watery. After the storms we had, some of the grapes were damaged. The skins had been punctured, the pulp exposed, and bacteria invaded.

IMG_1988-768x1024
Damaged grapes

Other ways in which grapes become infected is though Oidium – a powdery fungus that develops on the grapes. This is usually dealt with early in the season by spraying sulfur or other fungicides on the vines.  Another fungus that can develop is called Botrytis. Botrytis can in fact be a sought after mold – one that is made into delicious sweet wines. This is referred to a “noble rot”. In this situation, humid conditions are followed by dry conditions. The fungus removes water from the berries, concentrating the sugars. However, other mold and mildew can also form that are undesired and dangerous to the crop yield.

IMG_1956-768x1024
Good mold or bad mold?

It is important to inspect the vineyards frequently this close to the harvest. If sugar and acid levels aren’t perfect, but infection is quickly setting in, you might decide to pick the remaining healthy grapes early.

100 Berry Test

Aside from generally looking at the health of the grapes, a “100 berry” test is done out in the fields to roughly determine the sugar and acid levels. Approximately 100 grapes of one particular varietal are selected at random point all over grape bunches throughout the entire vineyard. Some from the bottom of the bunch, some from the top, some from the front, and some from the back. All over. These grapes are then pressed and the juices analyzed.

IMG_1995-768x1024
Pressing the grapes in the field

A refractometer is used to measure the sugar levels. In Germany we use the unit of measurement called Oechsle (in English: Brix). The acid levels are measured by adding a sodium hydroxide liquid to the juice. When the grape juice turns blue, you have the acid level reading. This process does not take many instruments or materials, so a quick analysis in the field is possible.

IMG_1996-1024x768
Taking readings in the field

The grapes we were looking at (Pinot Noir, Auxerrois, Scheurebe, and Riesling) all showed higher acid levels and lower sugar levels than desired. The outcome? It is clear that these grapes must be left on the vines for a couple weeks longer. Soon, however, the harvest will begin.

Mini Harvest – picking, pressing, clarifying, fermenting

Today, I went through the entire process of collecting grape bunches, separating the good grapes from the bad, pressing, clarifying, and starting the fermentation process. What a crash course for the harvest season!

The winery that I work at has a small amount of grapes vines directly on the property itself. These grapes have been attracting unwanted wasps for the past weeks, so it was time to take them down and make wine!  Let me tell you, it takes nerves of steel and a very zen head-space to remain calm while cutting grapes off vines surrounded by wasps. Surprisingly, I did not get stung once. Not even close. I am a zen master.

After the grapes were cut off the vines, I went through the time-consuming process of cutting out bad, vinegary, blackened, unwanted sections of grapes on the bunches.

Screen-shot-2015-09-01-at-10.32.55-PM
Separating the good from the bad

I then took the grapes and was shown how to press them. First we used a traditional press. This was a very lengthy process, requiring time for gravity and pressure to press the juices from the grapes, through the cloth, and out of the filter. I couldn’t believe the dirty grey/brown looking colour of the juice that came out! A degree of murkiness is necessary to give the yeast something to eat and something to hold on to.

IMG_1691-768x1024
Traditional press
IMG_1692-e1441139751708-873x1024
Colour of the must

We then switched to a hydraulic press. This went much faster and we were able to press three times. This press works through water pressure. The cylindrical tub is filled with the grapes, then a balloon in the center of the machine is filled with high-pressure water, pressing the grapes against the tub, through the cloth filter and out of the machine.

Screen-shot-2015-09-01-at-10.37.54-PM
Hydraulic press

After each press, the grapes (or what’s left of them) are moved and stirred by hand. By the third press, grape seeds started to come out of the machine!

When the pressing was done, we measured the sugar and acid levels of the must. Our readings were:

  • 79 Oechsle after first press
  • 77 Oechsle after third press (after the smaller, more acidic grapes are pressed)
  • 5 Acid level
  • 15L must

Then we added the clarifying agents:

  • 7-8g charcoal (5-10% charcoal/ estimated 5-10% rot)
  • 15g Bentonit (50/150g/ 100L)
  • 3g Floral Clair (10-20g? 100L)
  • 8ml Kieselsol (30-100ml/ 100L)
IMG_1703-e1441140864601-1024x544
Clarifying products used

Then it was time to ferment. A Riesling strain of yeast was added to 1 litre water and 1 litre wine. Because the juice was so cold, we left the yeast to begin the fermentation process in the small glass until the larger container warmed up, at which point the contents of the small container were added to the entire 15 litres of must.

Screen-shot-2015-09-01-at-10.40.59-PM
Starting the fermentation

Now each day I must check the sugar level and the temperature of the fermenting wine. I write my findings on a graph and track the changes. Updates to come.

(Also, apologies for mixing German and English terminology. It’s strange learning something new for the first time in a foreign language-I don’t even know some of these terms in English!)

Dangers in the field

As a gal who spent a summer planting trees in Canada, I’m prepared for uneven terrain, bugs, the natural elements, and the physical labour. I’ve got my sturdy hiking boots, gardening/work gloves, sunscreen, a hat, water, and no matter how hot it is I NEVER WEAR SHORTS. Nope. It’s just not worth it. While there is no fear of bears, or moose, or black flies here in the vineyards, there are twigs and bushes and thorns and rogue vines and, well, nature, galore.

Screen-shot-2015-08-14-at-7.41.16-PM-1024x683
Exhibit A: Battling prickly scrub and thorns.

Why are the rows not cleared of this brush, you ask? Yes, some are, but many are not for the same reason that these vines must be worked by hand. Two words: steep slopes. While sloping vineyards produce notoriously great wine due to the sun exposure, working at a 33-degree incline can be a little, shall I say, lopsided. Spending the entire time pulling leaves off of only one side of the vines (see article “First Days in the Field”), you end up a wee bit slanty (as well as with an uneven suntan—cough! sunburn). On the bright side, every day I feel stronger, and every day it gets a little easier. Just watch that you don’t take your newly developing sense of the all mighty vineyard power out on the growing grapes.

Screen-shot-2015-08-14-at-7.37.38-PM-1024x636
Exhibit B: Burrs. Everywhere.

Gear is also important. The boots I wear have been fantastic! My favourite feature is the low back on the boots. It really makes walking on steep slopes more comfortable. In harvest season I will wear waterproof, steel-toe boots. However, even though the boots give me stability, and the gloves I wear protect me from most cuts (as well as give a psychological sense of fearlessness), it seems that blisters are inevitable.

Lastly, as one prone to daily sun sneezes, I have to imagine that allergies would be a nightmare out in the fields. At least it wouldn’t be an allergy to wine itself that stops you from enjoying a well-deserved glass of at the end of a hard day’s work.

First days in the field

On the slopes above the Rhein River in Rüdesheim, Germany, I begin my internship working in the vineyards. This is my first week and there is so much to learn.

As I drive through the vineyards on route to our destination, I pass tourists and locals alike walking along the paths. In Germany, it is completely normal – and indeed commonplace – for people to wander through privately owned vineyards.

I always wondered whom these rows and rows of vineyards belonged to. A patch of pinot noir for winery x here, a patch of riesling for winery y there, so it goes.

unnamed
Looking out over the Rhein

The views are breathtaking from this vantage. It’s surreal to think that I have this opportunity to see, experience, and support the wine production process for this winery – from tending to the grapes, to harvest, to filtration, to bottling, and finally to selling (and tasting!).

IMG_1467-1024x768
Before and after leaf-removal

This week my job is to cull the leaves in front of the grapes to expose them to more sunshine and allow moisture to evaporate more quickly, thus reducing the chance of mold. I learn that on rows that run east-west one ideally takes the leaves off from the north-facing side. At a neighbouring vineyard, leaves had been removed from the south-side as well. The result? Sunburnt grapes. This ultimately affects the flavour of the future wine. Not good. On rows that run north-south, we pulled from the east-facing side to expose the grapes to the morning sun.

IMG_1433-e1439057279633-998x1024
Sunburnt grapes

As I start my internship at the winery on a week with temperatures as high as 38 Celsius, the fieldwork is particularly grueling. The slopes are steep, the labour is physical, and the sun is hot!

It is exhausting, yet satisfying, oddly relaxing, and at the end of the day, fulfilling work.

IMG_1483-1024x768
Steep slopes!